
Jenkins Dev: Getting started
The Jenkins Plugin tutorial is undoubtedly the starting point for plugin development, as it covers concisely well the lifecycle of a plugin, from the initial setup from an archetype to the distribution of the artifact. It provides several links which are worth checking before you roll up your sleeves and start coding.
Still, I see people very often struggling with conventions which are not well described, especially those binding the Jelly interfaces to the backend. So, the purpose of this post is to fill up this gap taking the Hello World plugin from the link above as reference.
Creating the Hello World plugin
To start with, we have created a new plugin from the archetype:
rezende-mac:Projects rafaelrezende$ mvn -U org.jenkins-ci.tools:maven-hpi-plugin:create
[INFO] Scanning for projects...
[INFO]
[INFO] ------------------------------------------------------------------------
[INFO] Building Maven Stub Project (No POM) 1
[INFO] ------------------------------------------------------------------------
[INFO]
[INFO] --- maven-hpi-plugin:1.114-cloudbees-1:create (default-cli) @ standalone-pom ---
Enter the groupId of your plugin [org.jenkins-ci.plugins]:
Enter the artifactId of your plugin (normally without '-plugin' suffix): tutorial
[INFO] Defaulting package to group ID + artifact ID: org.jenkins-ci.plugins.tutorial
[WARNING] Package name contains invalid characters. Replacing it with 'org.jenkinsci.plugins.tutorial'
[INFO] ----------------------------------------------------------------------------
[INFO] Using following parameters for creating Archetype: maven-hpi-plugin:1.114-cloudbees-1
[INFO] ----------------------------------------------------------------------------
[INFO] Parameter: groupId, Value: org.jenkins-ci.plugins
[INFO] Parameter: package, Value: org.jenkinsci.plugins.tutorial
[INFO] Parameter: artifactId, Value: tutorial
[INFO] Parameter: basedir, Value: /Users/rafaelrezende/Personal/Projects
[INFO] Parameter: version, Value: 1.0-SNAPSHOT
[INFO] ********************* End of debug info from resources from generated POM ***********************
[INFO] Archetype created in dir: /Users/rafaelrezende/Personal/Projects/tutorial
[INFO] ------------------------------------------------------------------------
[INFO] BUILD SUCCESS
[INFO] ------------------------------------------------------------------------
[INFO] Total time: 41.607s
[INFO] Finished at: Fri Sep 04 14:04:47 CEST 2015
[INFO] Final Memory: 15M/245M
[INFO] ------------------------------------------------------------------------
Below it’s shown the structure of a Jenkins plugin as loaded into Eclipse (Maven project):
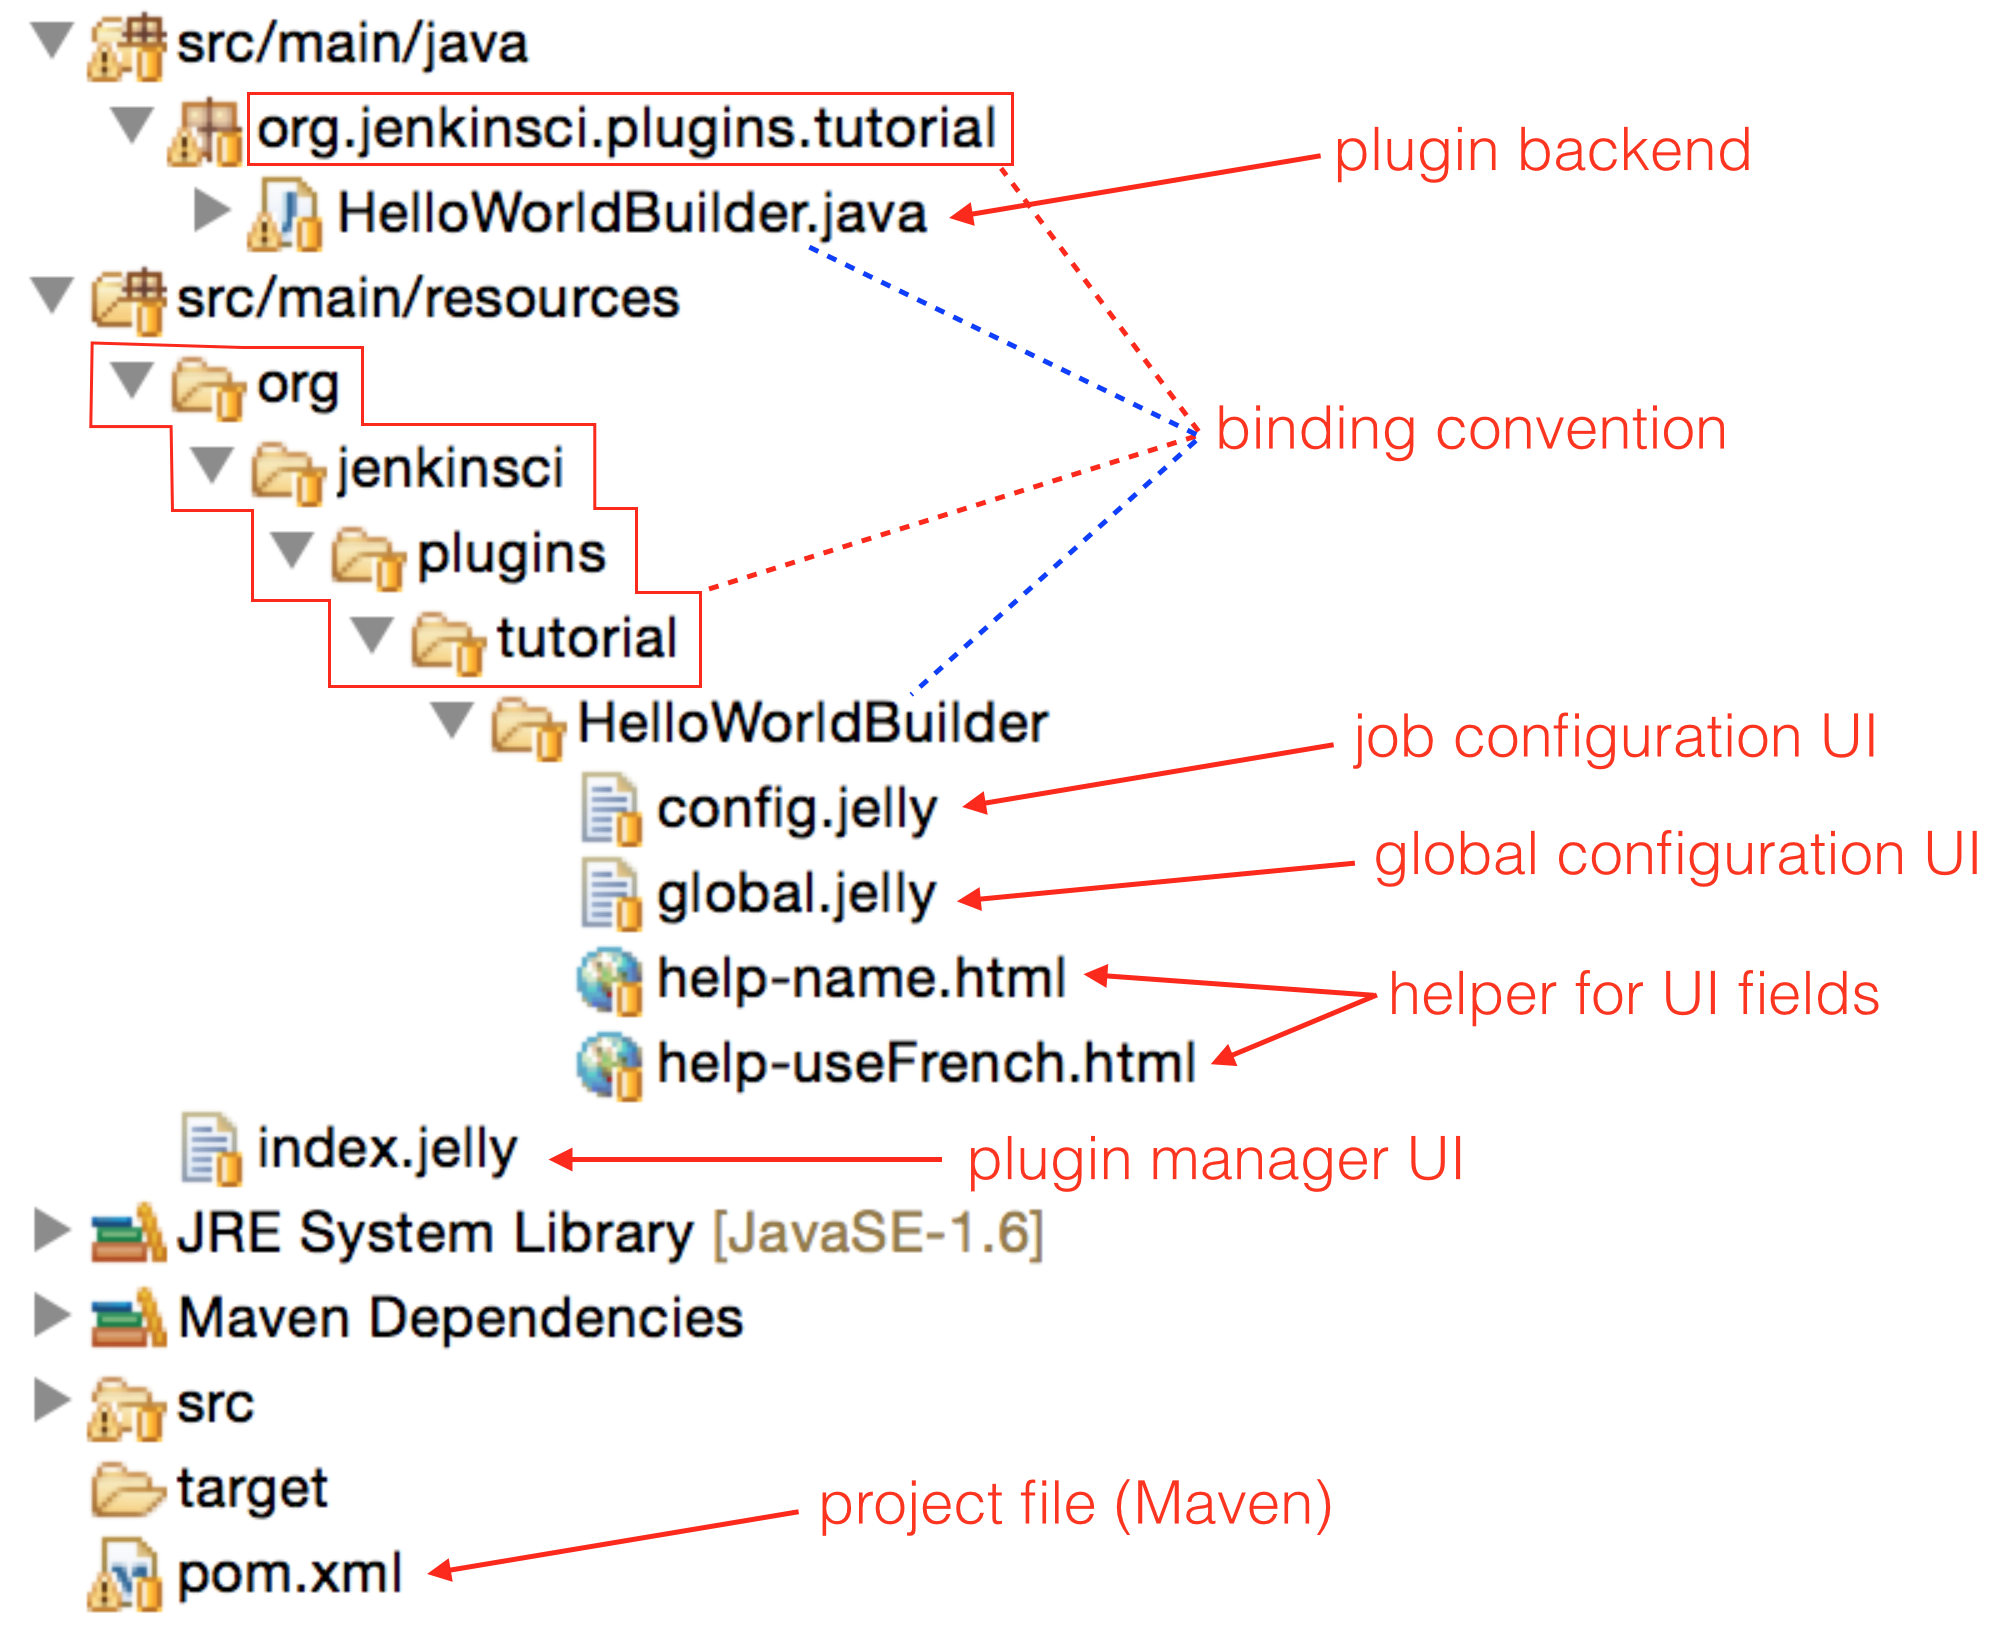
To navigate through the code, follow the links below:
- Plugin backend: HelloWorldBuilder.java
- Job configuration UI: config.jelly
- Global configuration UI: global.jelly
- Helpers for UI fields: help-name.html, help-useFrench.html
- Plugin Manager UI: index.jelly
- Project file (Maven): pom.xml
Plugin backend
Jenkins provides several Extensions Points from which we can manipulate builds, create views, reports and so on. This incredible flexibility allowed Jenkins to build a significant community over the years and transform itself into a synonym of Continuous Integration. Back to the topic, every plugin will extend one or more of those Extension Points, being the Builder extension one of the most used – as in our Hello World plugin.
The Builder extension creates a Build Step on Jenkins, accessed within Jobs. Build Step should also implement a SimpleBuildStep in order to be compatible with Workflow jobs (see post Jenkins: from freestyle to Workflow). The HelloWorldBuilder class is bound to the data, while the inner DescriptorImpl class is related to the layout.
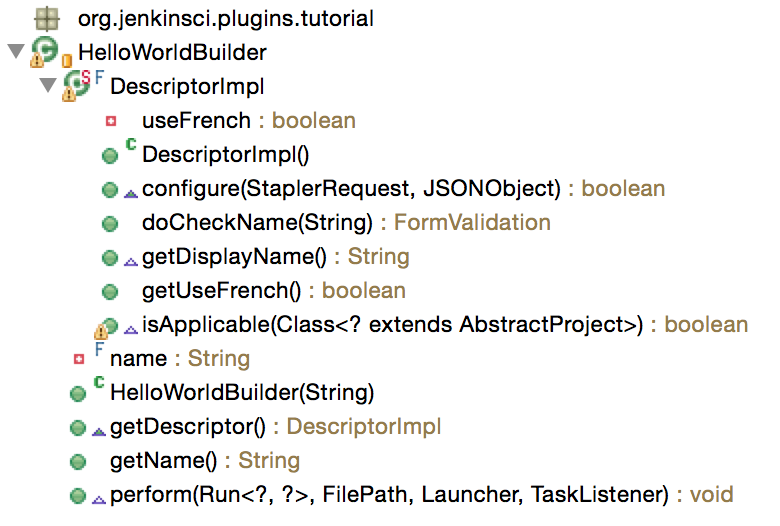
Jenkins relies on annotated constructor and setters to persist the configuration, and on getters to retrieve the configuration when the interface is loaded. The variables (in this case name) and respective getters and setters should match those in the Jelly file as seen later.
The perform(...) method dictates the behavior of the Build Step.
Details of implementation will be clear later on when we match the backend with the UI files.
User Interface
Jelly files use a XML-like syntax to describe the job configuration interface. Though very simple, Jelly builds a quite rich user experience with the most common UI features available – textfields, dropdown menus, checkboxes and so on. See Basic guide to Jelly usage in Jenkins, Jelly Taglib reference and Jelly form controls.
In order to understand how the user interface is composed, see below the step-by-step from installation to configuration. It’s important to follow the convention for the folder structure as shown in the first figure. When the plugin compiles just fine and Jenkins is executed but no interface is shown, this is the first place to double check for typos and inconsistencies.
–
Plugin installation
Plugins are installed in the Jenkins > Manage Jenkins > Plugin Manager configuration. Only three pieces of information are provided for each plugin in this list: Name and the URL associated to it come from the plugin’s pom.xml file; the Description comes either from the same file, or from the src/main/resources/index.jelly file, as in this case.

–
Global configuration
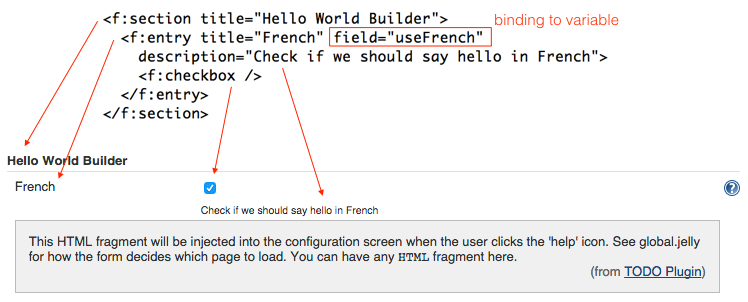
The global configuration for this plugin has it own section in Jenkins > Manage Jenkins > Configure System. It provides a single checkbox, with title and description, along with a hidden helper, which is shown once the question mark (?) is pressed.
The helper is in html format: src/main/resources/org/jenkinsci/plugins/tutorial/HelloWorldBuilder/help-useFrench.html.
The configuration itself is described in src/main/resources/org/jenkinsci/plugins/tutorial/HelloWorldBuilder/global.jelly.
Notice how the state of the checkbox is bound to the useFrench variable. Similarly, the helper is associated by the naming convention help-<variable>.html.
–
Job configuration
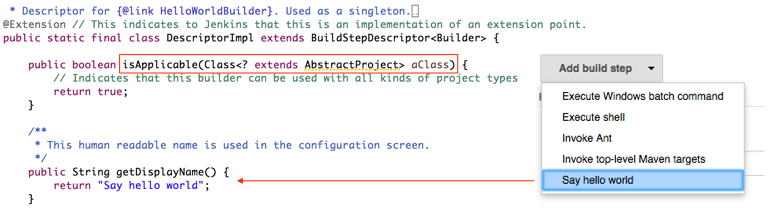
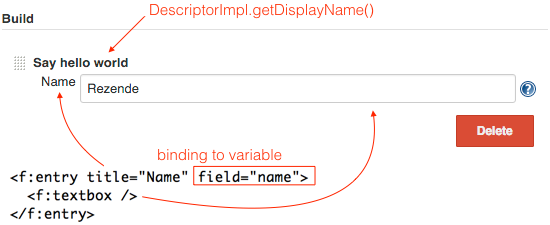
Our plugin is a Build Step, found in the Add build step dropdown. It’s only shown in job types where it isApplicable(). The label – Say hello world – is provided by the getDisplayName() method in the static descriptor class within src/main/java/org/jenkinsci/plugins/tutorial/HelloWorldBuilder.java.
The structure of the Build Step interface is very similar to that in the Global Configuration. The question mark (?) will open the helper for the name variable, thus, src/main/resources/org/jenkinsci/plugins/tutorial/HelloWorldBuilder/help-name.html
Though this time the configuration is using a textbox instead of checkbox, the binding is still specified by the field property of the enclosing f:entry. See the complete file in src/main/resources/org/jenkinsci/plugins/tutorial/HelloWorldBuilder/config.jelly
Additionally, Jenkins has a mechanism to statically validate user inputs in the DescriptorImpl class. The validation method is bound to the variables using another specific naming convention. For instance, our example validates the name input with the DescriptorImpl.doCheckName(...) method, which shows an error message for empty field, or a warning message for a name with less than 4 characters.

Build execution
This is the moment when the perform() method comes into play. When the global and job configurations are saved, their contents are persisted into .xml files in the Jenkins workspace. From this moment, all variables are available either from the scope of our Builder (i.e. name) or from its BuildStepDescriptor (i.e. useFrench).
The example perform(...) method is very simple, but shows how to use both variables and the logger feature.
The overriding enforces four parameters:
Run<?,?> buildis the main build-specific object and is used for the whole execution as it transits through the build steps;Filepath workspaceis path of the job workspace and it smartly abstracts the location where the build is executed, which could be either a master or any of its slaves;Launcher launcheris especially useful when the builder needs to start a external process (i.e. command-line);- Finally,
TaskListener listeneris mostly used for diagnosis and console output.
The perform(...) method is simple and self-descriptive:
@Override
public void perform(Run<?,?> build, FilePath workspace, Launcher launcher, TaskListener listener) {
    // This is where you 'build' the project.
    // Since this is a dummy, we just say 'hello world' and call that a build.

    // This also shows how you can consult the global configuration of the builder
    if (getDescriptor().getUseFrench())
        listener.getLogger().println("Bonjour, "+name+"!");
    else
        listener.getLogger().println("Hello, "+name+"!");
}
See the complete file in src/main/java/org/jenkinsci/plugins/tutorial/HelloWorldBuilder.java.
POM file
As a Maven project, the Jenkins plugin has its own pom.xml file, where build instructions are provided with project information, list of dependencies and so on.
Not much to say about it, since the Maven documentation available online is very complete.
See the complete file in pom.xml